Garbage disposal is a must-have home appliance if you want your modern kitchen to stay clean and tidy. How would you feel if you installed garbage disposal yourself, without incurring further costs of hiring a plumber after purchasing the unit? This article will give you a step-by-step process of teaching you how to install a garbage disposal as well as replacing your existing disposal. Moreover, the article will answer your frequently asked question, thus the best article for you.
How to Install a Garbage Disposal for the First Time? – Instructions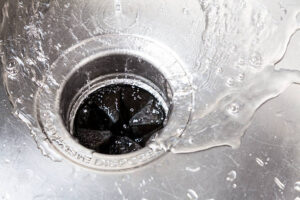
You have moved to your new home and now it is time to install your new garbage disposal for the first time. The procedure for installing garbage disposal is not difficult if you have the correct tools and materials.
Ensure that you have the correct type of disposal for perfect plumbing and follow the instructions in this article and you will have your garbage disposal functional within no time.
Part 1 – Getting the Equipment Ready
1. Figure out the Type of Garbage Disposal You Require
When you are shopping for your new garbage disposal, there are several factors that you have to consider. Think about the individuals that will use the disposal. Secondly, whether noisy garbage disposal will be an issue in your home and finally, the type of plumbing available at home.
If you have kids who will use the garbage disposal, buy a batch feed disposal instead of continuous feed disposal. The batch garbage disposal requires the use of a stopper before an operation making it safe for your kids. Continuous feed disposal begins running immediately you press your switch and will continue running even after switching it off. This can be dangerous in case your kids stick their hands inside.
Select a motor that is right for your home. A low horsepower motor is suitable for a small household will minimal food waste. Models with 0.5 horsepower are best for larger households with much food waste. If your plumbing is connected to your septic tank, you will buy a disposal that is designed for septic tanks.
2. Gather Your Tools and Other Supplies
For an appropriate garbage disposal installation, you will need the following tools and equipment:
- A screwdriver
- A hacksaw
- A disposer wrench
- Water pump pliers
- Electrical cord
- Plumber’s putt
- Safety supplies such as dust masks and goggles
Part 2 – Installing Your New Garbage Disposal
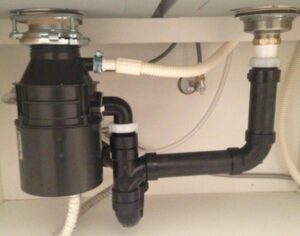
1. Disconnect the P-Trap as well as the Horizontal Extension Pipe
A pipe wrench or a channel-lock plier works well when loosening the nuts holding your pipes together. When both ends are free, remove the parts. It is good if you clean the horizontal drainpipe to remove the possible blockage, but not necessary for new construction.

2. Disconnect the Down Drainpipe – Using your channel-lock pliers or wrench, disconnect the down drainpipe that comes from the sink together with the connection that attaches it to your p-trap. When the connections are free, you remove the parts.
3. Unscrew the Large Nut – Untighten the large nuts that hold your strainer in place beneath the sink. After that, remove the strainer body.
4. Pry off the Snap Ring and Clean the Plumber’s Putty – With a flathead screwdriver, untighten the screws on your mounting assembly and then pry off your snap ring. Clean the plumber’s putty surrounding the edge of that drain opening.
5. Install the New Sink Flange – Place a 0.5-inch rope of your plumber’s putty around the sink’s drain opening and then drop the sink flange into this drain opening. If you place a weight including your garbage disposal on top of your sink flange, it helps to hold the sink flange in position while mounting it.
6. Install the Gasket and Flanges – From underneath the sink, slide your fiber gasket, the backup flange, and the mounting flange on the sink flange and hold the pieces in place.
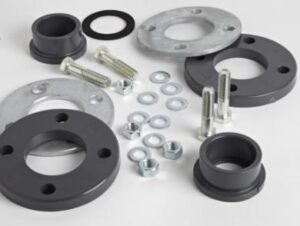
7. Slip-on Your Snap and Mounting Rings – Next, slip on your snap ring and mounting ring, and then tighten the mounting screws. Ensure everything is tightly sealed against the bottom of your sink.
8. Remove the Knockout Plug for the Dishwasher – If you are using a dishwasher, you will be required to tap out your dishwasher plug. Lay your garbage disposal with its side and then use a hammer and screwdriver to tap it out. Remove the knockout plug from the garbage disposal.
9. Connect the Electrical – If your garbage disposal unit has a factory-installed cord, plug it into your outlet beneath your sink after you are done with the above steps. For a hardwired unit, remove the cover plate and pull out the wires and do the connection.
10. Hang the Garbage Disposal – Hang your garbage disposal by aligning the mounting tabs on the mounting ring. Hold your disposal in place and then turn the mounting ring until all tabs are locked.
11. Insert the Discharge Tube – Insert your discharge tube into its discharge coupler and then slide its clamp over this discharge tube. Finally, position it in your groove on the tailpipe coupler.
12. Align the Discharge Tube with Your Drain Pipe – Rotate your garbage disposal to align the discharge tube with the drain trap.
13. Lock the Disposal in Place and Test it – After everything is installed, lock your disposal to its sinking mount assembly with the wrench. The last step is to check for any leaks in the dishwasher, sink flange, mounting assembly connections, and tailpipe. Run the unit to test the operation.
How to Replace a Garbage Disposal?
Below is a step-by-step process of replacing your existing garbage disposal.
Part 1 – Removing the Old Disposal
With the following instructions, you can safely remove your old garbage disposal:
1. Turn off the Power – Switch off the electric power at the circuit breaker or the fuse box.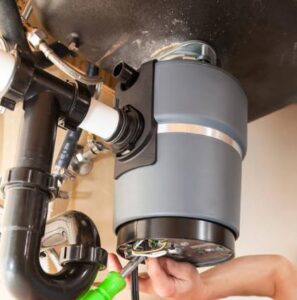
2. Detach the Dishwasher Hose – Although not all garbage disposals are connected with a dishwasher, for the connected ones, use your screwdriver to untighten and detach the hose that attaches your disposal to the dishwasher.
3, Detach the Waste Line – Remove the P-trap waste line that runs from your disposal with a wrench to unfasten the slip-nut that connects the disposal to your trap. Place a bucket below the trap to collect any wastewater present at the bottom.
4. Take off the Disposal – Remove your disposal by inserting your screwdriver into the ring lug and rotate counterclockwise to unfasten.
5. Remove the Rest of Your Mounting Assembly – Remove the mounting ring on the sink, the flange, the plumber’s putty, and the fiber gasket. Finish preparing your sink for new garbage disposal by cleaning the flange, sleeve, and the sink opening.
Part 2 – Installing Your Garbage Disposal
Now that you have taken off your old garbage disposal unit, It is time to install your new garbage disposal unit.
1. Wire Your Disposal
Some disposals come attached with appliance wires while others do not. If yours does not, you will remove the cover plate underneath the disposal and then attach the wires as per the instructional manual
- Install the mounting ring and the drain flange.
- Roll the plumber’s putty between your hands to make a snake 0.5 inches thick and 25 cm long. Use it on the underside of your drain flange underneath your sink.
- Thereafter, snap on your backup ring, the fiber gasket as well as the mounting ring. Use a screwdriver to tighten the mounting ring against the sink.
2. Mount Your Disposal
Place your garbage disposal into your mounting ring ensuring that the outlet is facing its drain pipe connection. Fasten it until the garbage disposal stays in place.
3. Connect the Disposal to Your P-trap.
With a hacksaw, cut the discharge pipe according to the right measurements and attach it to your outlet on the garbage disposal. Ensure you follow the instructional manual. Also, attach the dishwasher tube discharge.
4. Check Your Disposal
Turn on the power and run the water into your sink to check for leaks and ensure your disposal is working. Run some food to be sure that your disposal grinds well and disposes of it perfectly.
How to Install a Garbage Disposal in a Double Sink?
A double kitchen sink allows cleanups in your busy kitchen and installing disposal will improve your kitchen hygiene. Below are steps to follow to install your garbage disposal in a double sink:
Part 1 – Installing a Dual Drain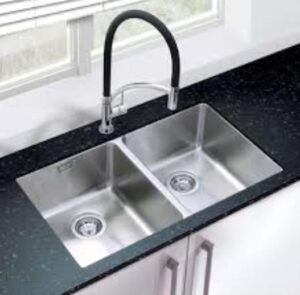
- Disassemble your drain kit by unfastening the locknut from the strainer and then remove the rubber washer and the locknut.
- Pack the underside of your strainer using the plumber’s putty by stitching the putty into balls and wrapping them around the drain flange edge. Next, insert the bottom of your strainer via the drain hole in the bottom of your sink, and then press the strainer against that sink.
- Bolt the locknut from under the sink and then tighten it. Tighten the nut until a knife blade cannot go through the sink and the strainer flange.
- Screw the tailpiece to the strainer and make it as tight as possible.
Part 2 – Connecting Your Double Sink Drains
- Install the drains onto your sinks in a double set and then screw on the tailpieces with the same lengths.
- Use either one or two configurations for your drain pipes according to the placement of your wall drain.
If it lies between both drains, install a 90-degree elbow for each tailpiece. If your drain is lined with one of your drains, install a sanitary tee on your tailpiece that is nearest to the drain. - Run horizontal pipes from the two drains and then connect them using a double 90-degree tee. Use a short length pipe from the bottom of your double tee and connect your P-trap to the pipe.
- Connect the double sink drains using a length of the horizontal pipe, where the wall drain is behind one of your sinks. Attach your P-trap to the bottom of your tee on the sink that is nearest to the wall drain using a short length pipe. Then, extend the horizontal arm trap to your wall.
- The double sinks being connected, follow the steps of installing garbage disposal as discussed above in this article.
How to Install a Garbage Disposal with a Dishwasher?
Kitchen Plumbing does not feature a drain line for your dishwasher, and for this reason, you need to install your dishwashers under your countertop next to your sink cabinet using a drain hose via the side of your cabinet. Below are the steps to follow:
1. Unplug your garbage disposal from the power outlet in your sink cabinet. If it is permanently wired to the circuit, switch off your disposal at the breaker panel.
2. Insert the tip of your screwdriver in the hose nozzle that is located on top of the larger drainpipe beside the garbage disposal. Tap the screwdriver end with a light hammer to dislodge your knockout plug that is inside the nozzle. Remove the plug from your nozzle using the needle-hose pliers.
3. Insert your threaded stem on top of your air-gap fitting into the back hole of your sink from below. Put the given washer on the upper end of the screw and stem on the trim using your hand.
4. Rotate the air-gap by hand so that the nozzle points towards your garbage disposal.
5. Push one end of the given disposal drain hose to the nozzle on the unit. Then, slide both of the hose clamps onto the end of the hose and fit the lower clamp to the hose that is at the nozzle and tighten with a screwdriver.
6. Use a utility knife to cut the upper end of your hose to the desired length so that it can fit on the air-gap nozzle without having to bend it. Slide your other clamp up and also around the upper end of your hose to fasten it securely.
7. Slide your 1-inch hose clamp to the end of your dishwasher drain hose. Cut the necessary hose length to fit onto your vertical nozzle on the air gap without a loop in that hose. Fit the end onto your vertical nozzle and then secure it using the hose clamp.
How to Plumb a Single Bowl Kitchen Sink with Disposal?

1. Materials
wire strippers, screwdriver, hammer, utility knife, plastic putty knife, large slip-joint pliers, non-contact electrical tester, the disposal unit, rag, or cloth.
2. Step-by-Step Process:
- Switch off your circuit breaker for the garbage disposal wiring.
- Use your slip-joint pliers to unscrew the couplers that join the P-trap as well as the drain’s extension pipe to your sink underbelly. With the rag, plug the drain so that the smell from the drain will not be an issue.
- With the pliers, unscrew the bolt under your drain coupling and push the coupling upwards to detach the drain flange from your sink’s bottom.
- Use the putty knife to scrape the plumber putty from the drain hole. Next, rub some putty around your disposal. Insert the flange into your sink’s bottom hole and then move the gasket and ring to your flange’s open sleeve underneath the sink.
- Attach the mounting ring, then snap it on. Thereafter, tighten the screws for a firm fit against the drain.
- If a dishwasher is present, use the hammer and screwdriver to push out your dishwasher knockout plug that is located on the side of your garbage disposal.
- Remove the wiring compartment of your disposal unit and use six inches of the electrical cable from your wall switch. Insert it into the wire clamp and tighten the clamp with your screwdriver.
- With a utility knife, unsheathe the cable already present in the wiring compartment and then use wire strippers to cut 0.5 inches of insulation from the white and black wires.
- Use the wire screws to attach the white wire to the other white wire from your disposal unit and the black wire to the disposal’s black wire. Tuck all these wires into your wiring compartment and then close it.
- Place your disposal system onto its mounting ring and then turn the unit until its outlet faces your drain pipe.
- Place the discharge tube from the disposal inside your disposal’s outlet and then tighten the coupler.
- Remove the rag from the drain line then return the extension pipe and the P-trap.
- If you own a dishwasher, connect the drain line to the dishwasher knockout and then tighten the coupler.
- Return the circuit breaker and then open the faucet that is over your sink and finally turn on the garbage disposal unit.
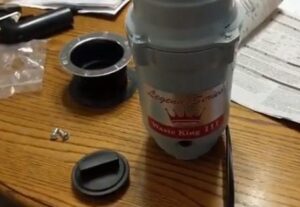
How to Install Insinkerator/Waste King Disposal?
Waste King garbage disposal is a popular type of trash disposal for the kitchen. Below are the steps of installing your waste king disposal.
1. Remove the existing assembly – Remove all the parts of your Insinkerator from the package and organize all the contents. Remove the existing drain basket and P-trap from your sink. Place a bucket below the sink to hold any wastewater present in the drain.
2. Apply putty – Locate your flange gasket and roll the putty into the shape of a snake approximately 0.5 inches in diameter and wrap around your gasket beneath the flange.
3. Clean the sink – Clean your sink thoroughly around your drain opening.
4. Attach the fastening system – Insert your flange on the top side of your sink and then attach your fastening system underside.
5. Attach mounting plate – Attach the mounting plate underneath the sink and then fasten the screw, but do not tighten them.
6. Secure Tailpipe – Attach the tailpipe to your rubber seal beside the Insinkerator and then secure it with your metal spring ring.
7. Remove the breakout plate – If you will be draining your dishwasher via your Insinkerator, locate the breakout plate and remove it with a hammer and screwdriver.
8. Connect wiring – Remove the plate using a screwdriver to reach the electrical wiring if the Insinkerator does not have an attached power cord.
9. Attach Disposer Unit – Align your rubber seal ring onto the top of the Insinkerator using the flange beneath your sink. Press it firmly to place and then secure it loosely by rotating the mounting ring onto your ramp tabs of the upper part mounting ring.
10. Connect the Disposer to P-trap – With a PVC cutter, trim the PVC extender pipe and then connect the Insinkerator to the P-trap.
11. Secure Unit – After assembling your drain, rotate the lower ring for mounting until the mounting tabs are locked to your ridges within the ramps.
12. Ensure the Insinkerator is secure – Test for the water tightness and check for any leaks to ensure that the Plumber’s putty made a good seal.
FAQs
1. Is It Hard to Install a Garbage Disposal?
No. Installing your garbage disposal is not difficult as long as you possess all the right tools and equipment. Ensure that you have the correct disposal unit for your plumbing and follow the instructions accurately.
2. How to Wire a Garbage Disposal Switch and Outlet?
Some disposals come attached with appliance wires while others do not. If yours does not, you will remove the cover plate underneath the disposal and then attach the wires as per the instructional manual.
3. How to Hook up a Garbage Disposal?
After assembling your drain, rotate the lower ring for mounting until the mounting tabs are locked to your ridges within the ramps
4. How Long Does It Take to Install a Garbage Disposal?
Installation of your garbage disposal will take between 2 to 4 hours depending on whether the already present plumbing is well set for disposal, the current plumbing conditions and sink, an outlet is nearby and the size and type of your disposal.
5. How Much Does It Cost to Install a Garbage Disposal?
A garbage disposal unit installation will cost you between $80-720 or an average of $400. However, you can compare the quotes from different plumbers and determine the best choice according to your budget.
6. How to Remove a Badger Garbage Disposal?
Follow the steps below for successful removal of your garbage disposal:
- Shut off the power supply coming to your garbage disposal from the electrical service panel or the circuit breaker.
- Unplug your garbage disposal from your wall socket.
- Loosen your hose clamp that joins the dishwasher hose to your barbed dishwasher nipple and then remove the hose.
- Place a container under the wastewater pipe to collect the water present.
- With an adjustable wrench, remove the fittings that are on your P-trap.
- Let the water in this P-trap drain into your container.
- Remove the garbage disposal.
7. Can Dishwasher and Garbage Disposal Be on the Same Circuit?
Some electricians wire your kitchen so that your garbage disposal and dishwasher are powered by one circuit, but it must be a 20-amp circuit. You must be very careful to ensure that the total amperes do not exceed 80 % of the rating on your circuit amperage.
Conclusion
In conclusion, this article has given you well-detailed information on how to install your garbage disposal unit. You are, therefore, in a better position to do the installation alone without the need to hire a plumber.